Beginner's Guide of Collaboration through Git (I)
A Missing Git Intro From and For Monash University IT Students
Reasons for This
As a Monash student, I have been asked to use Git (and GitHub/GitLab) in many Faculty of IT units. However, none of them has ever taught us how to collaboratively code through Git properly.
In my memory, Introduction to Database (FIT9132) is the only unit that did teach us some basic Git actions (commit, push, and pull), while that unit was only using GitLab as a random cloud drive. With the bare Git knowledge, most of the IT students I know have totally no idea about how to collaborate through Git.
Ironically, the later group assignments from other units did ask us to work in a group through Git. As a result, all of our group Git repositories had been in a total mess until I finally figure these things out through my internship.
Hmmm, universities.
Re-introduce Git
Git is a version control system (VCS):
Version control is something you would do when you need to revise a work again and again. For example, your Microsoft Word documents with filenames consisting of v1 or v3.2 are attempts of version control, although simple and not really successful.
With a good practice of version control, you should be able to track all changes made to your works and revert your works to any previous version easily. When it comes to software engineering, even a tiny project can include lots of source code files, which makes version control harder and more complex. In this case, to apply a good practice of version control, you have to use a professional VCS.
Git is distributed:
Git is not the only VCS software for software engineering, there’re many other choices like CVS, Subversion (SVN), etc. SVN used to be popular, while Git is the dominant one now.
One of the reasons making Git popular is that it’s distributed, while SVN is centralized. Although most Git projects usually have a central server too, every repository cloned from the original one is equal and fully functional. Whenever you clone a Git repository, the commit history is cloned too. Hence the cloned repository can work independently just like the original one without any network connection.
Choose Your Git GUI Client
Yeah, you can definitely use Git in the command line like what professional users would do, but this introduction is for people being afraid of the complexity of Git, just like me. GUI clients can be easier for beginners to start, instead of freaking them out.
Here is a list of some common choices:
- Tower (Paid, Free for Students)
- GitKraken (Freemium, Free for Students)
- Gitfox (Paid, Available in Setapp)
- Fork (Free)
- Sourcetree (Free)
As a user, you can freely choose whatever is comfortable and easy for you. At Monash University, GitKraken is recommended in several IT units. It may be a good choice if you are using Windows. However, as a macOS user, I prefer Gitfox or Tower.
What Learned Before
Here are a few actions taught in FIT9132. These are fundamentals even if you are going to use GitHub/GitLab only as a single-user cloud drive.
Clone
Clone is the first command of most Git beginners. It clones a remote repository to your local machine.
Every repository cloned from the original repository is a fully-functional copy containing commit history. Although the original repository would be recognised as upstream, these clones can work independently without connections to the original repository.
Commit
Commit is a basic submission in Git. Each commit links to its parent commit recursively and record file changes compared to its parent commit. With all parent commits of it, a commit can present the whole repository’s state and file contents.
Whenever you made a step or leave your work, you would commit your changes. Within a properly committed repository, you can also easily revert your code to a previous state so you won’t worry about messing up your code.
Different from some other VCS software, commits will only save your changes to the repository locally, to submit these changes to the remote repository, you need to perform a push after committing.
Pull & Push
To synchronize a local repository with its remote repository, pull and push are needed after committing. In a local Git repository configured with a remote repository, pull is to fetch and apply new commits from remote on local, while push is to submit and apply newer commits from local on the remote. These two actions represent different directions of synchronization.
As mentioned above, repositories cloned are independent and functional without dependencies on the original repository. When performing a commit, file changes are only committed to the local repository. In a good practice of data backup, you should push frequently after committing.
What’s More
Fetch
Fetch is like refreshing. When a remote repository has been updated, local Git needs to fetch these updates. Fetch only updates the local cache on a remote repository without changing anything in the local repository.
Most Git GUI clients will perform fetch regularly and before each pulling. Besides performing a pull immediately, you can also perform a fetch only to see the newest state of remote repositories.
Amend Commit
Amend Commit allows you to change your latest commit instead of making another commit. This can be useful when your previous commit is incomplete or has a mistake.
Force Push
Sometimes a normal push could fail, especially when you have changed your history commits (for example, an amend commit) which have already been pushed to the remote. In this case, you need to add a force flag when you push.
Use the force flag cautiously, as it can drop lost your history commits in the remote. A force push would override history commits in your remote repository to make it the same as your local repository.
Branch
Branching is an important concept in Git collaboration. It makes Git the most suitable version control system for coding collaboration.
Creating different branches allows a group of people to work on different objectives in parallel. Usually, you should create a branch with an objective from the main branch before actually coding. With branches created for each objective, everyone can focus on their branches and won’t affect or be affected by other branches.
Stash
Stash allows you to save your unsaved changes from the working zone to a temporary area instead of committing them. It’s like a clipboard.
Merge
Merge can apply changes in newer commits of a branch to the end of another branch.
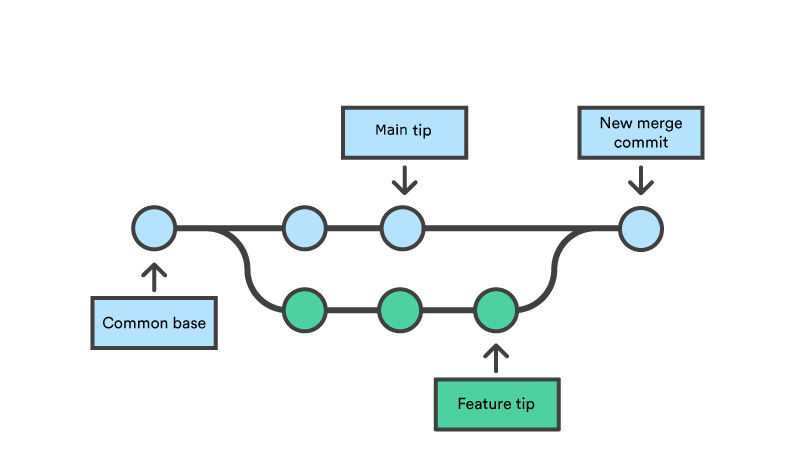
Merge is often used when you finished your goal in a side branch and want to merge changes from your side branch back to the main branch.
Rebase
Rebase can apply newer commits from a branch before the unique commits of another branch.
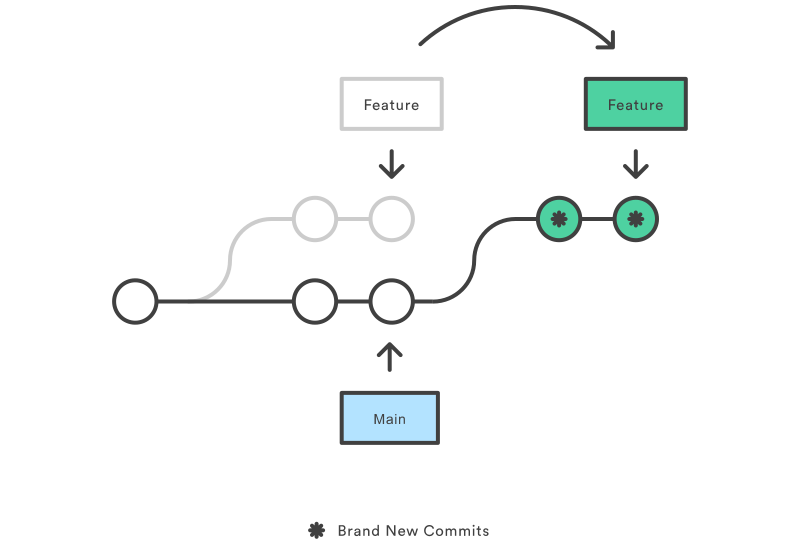
Rebase is widely used when you have created a side branch from the main branch and already committed some new changes in the branch, while the original main branch has been updated with newer commits after your initial branching. Rebase can be useful here to apply newer commits from the main branch to your side branch before your commits.
Pull Request (or Merge Request in GitLab)
Pull Request is not a feature of Git, but from GitHub. It’s called Merge Request in GitLab.
PR (GitHub) and MR (GitLab) are the same things, it’s a request you created online to merge your branch to another. When you shouldn’t or don’t have permission to directly push commits to the main branch, you should create a PR/MR through the GitHub/GitLab website. After approval, the merge process will be conducted by GitHub/GitLab.
Collaboration, Git — May 12, 2022